| | |
| | |
| |
|
| Index Documenti Synth Chitarre Organi Download News |
|
|
| |
| Roland JP-8000 Music Synthesizer Quick Guide Manual | |
| Basic
Synthesis on the JP-8000
The following is a list of features on the JP-8000: " DSP oscillators simulate 7 different analog waveforms, Oscillator sync, Cross and Ring modulation " 8 voice polyphony " Keyboard splits and layers " 90 Arpeggiator styles, 48 Realtime Phrase Sequence (RPS) patterns " Effects- EQ, Chorus, Flanger, Phaser, and Delay " Sliders and knobs transmit MIDI data " Arpeggiator, LFOs, and effects that sync to MIDI " 256 Patches and 128 Performances " New Super Sawwaveform that models 7 saw waves using only one voice of polyphony " Motion Control for storing slider and knob adjustments over time " Ribbon Controller that can simultaneously control several specified parameters Since
the layout of the JP-8000 is similar to a conventional analog synthesizer containing
knobs, buttons and sliders for all sound-related parameters, it is quite easy
to move the front panel knobs and sliders to modify the JP-8000 sound. First, we will start by looking at elements that make synthesizers work. Then, we will discuss in-depth the waveforms that are available on the JP-8000. We will then cover the basic architecture and signal flow of the JP- 8000. Finally, we will walk through the basic creation of a sound on the JP-8000 to give you some ideas you can work from yourself. Synthesis Overview Developments in the science of musical acoustics in the second half of the nineteenth century coincided with discoveries in the field of electricity. In 1862, Hermann von Helmholtz published what would become a landmark paper called Sensations of Tone in which he demonstrated that a musical sound could be broken down to a few basic physiological principles. He showed that the quality (timbre) of a tone relied on the intensity, order, and number of harmonics present in the note. The single musical note consists of a fundamental tone and related vibrations (harmonics) above the fundamental. The fundamental tone and its harmonics create tone color (timbre). We are surrounded by countless types of sound. Sound is interpreted by the ear as vibrations or waves in the air, and it is the shape of these vibrations that determine what type of sound you are hearing. Musical sound can be defined through an understanding and manipulation of five basic functions: frequency, timbre, amplitude, duration, and envelope. These terms are defined as follows: Frequency
is the pitch of the sound. The pitch is determined by the speed at which the wave
repeats or cycles per second. As the frequency increases or decreases, the pitch
will raise or lower respectively. For example, A4 has a frequency of 440Hz. If
this pitch is raised an octave, the frequency will double (A5=880Hz). If it is
lowered by an octave, the frequency will be cut in half (A3=220Hz). Timbre is the nature or quality of a sound. All sound waves are complex and contain more than one frequency. If one frequency is dominant, that sound can be related to a pitch of a musical scale. If frequencies are in competition with each other, a dense or unusual texture can occur. It is timbre that distinguishes a simple sine wave from a piano sound when the same pitch is heard. It is generally known that waveforms are made up of multiple sine waves. For example, a sawtooth or square wave consists of a fundamental frequency plus integer multiples of the fundamental frequency such as 2x, 3x, etc. These multiples of the fundamental frequency are called overtones or partials. Partials that are even multiples of the fundamental are referred to as harmonic partials and partials that are odd multiples of the fundamental are referred to as enharmonic partials. By combining these two partials, an infinite range of sounds can be created (see the following example).
Duration is the length of time that a sound is audible. Acoustic instruments like a piano have inherent duration limitations due to the mechanical nature of the instrument. However, electronic instruments have the ability to sustain a sound indefinitely. Duration is closely related to the principles of the sound envelope. Envelope characterizes the way a sound changes over time. An envelope consists of two main components: attack and decay. The are three main envelopes on the JP-8000 - Amplifier Envelope (TVA), Filter Envelope (TVF) and Pitch Envelope. In the case of an amplifier envelope, attack refers to the time it takes for a sound to reach its maximum loudness and decay refers to changes in the sound after it reaches its maximum loudness. A string sound usually has a slow attack taking a long time to raise to full volume after the sound is triggered. On the other hand, a piano sound raises to full volume almost immediately after the sound is triggered. The following are examples of the three different types of envelopes: Pitch, Filter, and Amplitude.
In
the above example, you can see how Brass instruments, such as a trumpet, often
have a slight variance in pitch when the sound is first heard. On a synthesizer,
this time-variant pitch changecan be created by using a pitch envelope. Filter Envelope The filter envelope can be used to determine the timbre of a sound. This can also be thought of as the color or nature of a sound. It is the timbre that distinguishes one sound from another when the same pitch is heard. The example above shows what the filter envelope might look like for a piano sound. Piano waveforms contain the most partials when a note begins. As the sound decays, the upper partials gradually diminish, causing the tone to become darker in quality. On a synthesizer, this time-variant timbre change can be created by using the filter envelope. The JP-8000 contains the following types of filters: High Pass Filter (HPF) This is a filter that allows higher frequencies to pass and restricts lower frequencies. The point that divides the high and low frequencies is referred to as the cutoff. Low
Pass Filter (LPF) This is a filter that allows lower frequencies to pass and
restricts higher frequencies. The point that divides the high and low frequencies
is referred to as the cutoff.
The way a sound s volume changes over time varies for different instruments. The examples above illustrate the differences in the amplitude envelopes for a typical piano sound versus that of a typical organ sound. The piano waveform reaches its maximum loudness the instant a key is pressed and the hammer contacts the strings. Then, it gradually diminishes in volume. On an organ, the same volume is sustained for as long as a key is pressed. On a synthesizer, this time-variant volume change is created by the amplitude envelope. Waveforms A sound wave can be represented graphically according to its varying frequency and amplitude functions. Sound waves have two basic characteristics, frequency (defined by the number of vibrations per second) and loudness. While most of the sounds we hear in electronically produced music are combinations of multiple waves that may have been treated by adding tone color, it is possible to catalog the basic waveforms as well as introduce new waveforms. The waveforms in the JP-8000 are: sine, triangle, sawtooth, square, super saw, triangle modulation, feedback oscillator, noise, and sample and hold. In order for us to hear these waveforms, a device called an oscillator produces these waveforms in as pure a form as possible. The following is an explanation and graphic representation of these waveforms: Sine
- The sine wave is the purest type of wave. This wave should contain no harmonic
overtones. Generally, all waveforms are made up of multiple sine waves. Sawtooth - More complex than the triangle wave, this wave contains many more harmonics than the simple sine wave resulting in a full sound. Super Saw -Square - The square wave is a sharp, angular wave with more overtones than a triangle wave, but contains the grittiness and reedy feel of a sawtooth wave. The
Super Saw is a new sawtooth-type waveform that Roland developed specifically
for the JP-8000. It simultaneously produces seven sawtooth oscillators using only
one voice of polyphony. The Super Saw wave is ideal for creating very thick textures
never heard before. Triangle Modulation -This waveform is another new development from Roland for the JP-8000. It is a modification of the triangle wave with a large number of overtones added. Feedback Oscillator -The Feedback Oscillator is yet another new waveform from Roland similar to the sound of electric guitar feedback. When selected, only one voice will sound at a time. This waveform is great for solo-type sounds. Noise
- A noise waveform is completely random, resulting in a hissing character. This
waveform is generally used to create unusual sound effects, most commonly types
of wind, ocean swells, etc. Sample and Hold -This waveform samples an input source (typically a noise generator) and holds it at a particular voltage. Since it usually looks at a random source, the end result is also random. Architecture of the JP-8000 The architecture of the JP-8000 is divided into three sections: Controller section The Controller section of the JP-8000 consists of the keyboard, front panel buttons, sliders and knobs, pitch bend/modulation lever, ribbon controller, and pedals connected to the rear panel. These are what play and modify the sound. Sound Source section The Sound Source section of the JP-8000 actually produces the sound. Messages from the JP-8000 s Controller and Sequencer sections tell the sound source when and how to produce sound. MIDI messages from an external device can also control the sound source. The sounds of the JP-8000 are organized as follows: Patches/Performances- There are 256 Patches in the Internal memory (128 Preset and 128 User) of the JP-8000. Two Patches are combined to make a Performance. A Performance consists of an Upper and Lower Part, which can either be layered (Dual mode) or set up as a keyboard Split. There are 128 Performances in the Internal memory (64 Preset and 64 User) of the JP-8000 (See section V. for details). Sequencer section The Sequencer section of the JP-8000 records keyboard playing and slider movements as MIDI messages for playback. These messages can also be transmitted to external MIDI devices via the JP-8000 s MIDI output. The Sequencer section of the JP-8000 is made up of the following three parts: RPS (Realtime Phrase Sequence) - By pressing a key on the JP-8000, an original sequenced pattern can be played back. The 48 RPS patterns available in the JP-8000 are useful for constructing songs in realtime. Arpeggiator - There are 90 different rhythmic or cyclic patterns that can be selected for play back of Patches. This is a great source for musical ideas such as creating bass lines and glissando-type effects. Motion Control - Much like a conventional sequencer records notes to create a phrase, movements of the JP-8000 s front panel knobs and sliders can also be recorded to create interesting realtime effects during a performance. There are a total of 4 recordable Motions in the JP-8000. The signal path of the JP-8000 is defined as the processing order of a sound from the time a key is pressed on the JP-8000 s keyboard until it becomes audible to the ear. When a key is pressed, it triggers a sound source called an oscillator. In the case of the JP-8000, there are two oscillators, each containing a selectable waveform as the basis of its sound. These two oscillators (OSC 1 and OSC 2) can be layered, detuned, and even synced together. The Oscillator Common section provides parameter settings for both oscillators and pitch related settings. The pitch can be further modified over time by the pitch envelope. When all of the aspects of pitch are determined, the filter then modifies the timbre of the sound. The filter is commonly used for adding brightness to a sound or to create a mellow, hollow-type sound. Like the pitch envelope, the filter envelope modifies the timbre over time and can be used to create many familiar effects such as a guitar wah or a keyboard swell. The sound then travels to the amplifier where modifications to the volume or loudness of the pitch and filter are made. The amplitude envelope modifies how you will hear the changes made in amplitude over time. LFOs 1 and 2 can be used to create expressive modifications to the sound such as vibrato and modulation. LFO 1 can have independent settings that can be applied to the pitch, filter, and amplitude sections. Tone
controls (bass and treble) and effects such as delay and chorus can then be added
to further contour the sound. Memory Memory
is where settings such as Patches and Performances are stored. The JP-8000 includes
four types of memory: System memory - This memory location stores MIDI related settings and other System parameters which affect the overall operating environment of the JP-8000. User Memory - This memory location stores settings you create. It contains 128 Patches, 64 Performances, 48 RPS patterns, and 4 Motions. Preset
Memory - This memory location contains 128 Patches and 64 Performances that
cannot be modified. Temporary Memory - When you select a Patch or Performance, it is called into Temporary Memory to be edited and played. Any changes you make to the Patch or Performance are not permanent. If you would like to save your edits, your modifications can be written into a permanent User Memory location by using the Write procedure. (see VI. Storing a Patch). In
the case of RPS pattern, Motion, and System settings, your settings are written
directly into memory. There is no need to perform a separate operation to save
the data. Basic Sound Manipulation on the JP-8000 This section is a hands-on tutorial intended to provide you with information needed for basic analog synthesizer programming. The JP-8000 is loaded with amazing Patches and Performances that utilize complex programming. Since the intended goal of this document is to understand the basic principles of synthesis, we will use an Initialized Performance as the basis for the following experiments.
Getting Started Before we proceed, execute the following procedure to Initialize a Performance: 1) Press the PERFORM/PATCH button until PERFORM is in the left corner of the display. 2) While holding the SHIFT button, press the INT/UTIL ([7]) button until Initialize is displayed. 3) Use the BANK/VALUE buttons to display Initialize PERFORM: TEMP. 4) Press the WRITE button to execute the Initialization. When complete, the display should will read INIT PERFORMANCE. When you play the keyboard of the JP-8000, you will hear a sawtooth waveform produced by OSC 1 and a triangle waveform produced by OSC 2. NOTE: The Initialized Performance resides in the Temporary Memory Area and does not affect the previous Performance settings. To recall the previously saved Performance settings, simply press the corresponding number button under the display. The original Performance will then be re-called to that memory location.
It is a good idea to get accustomed to the sound of the different waveforms in their purest form. Select the different waveforms by pressing the WAVEFORM button in the OSC 1 section and play a few notes on the keyboard of the JP-8000. When finished listening to the waveforms, return to the sawtooth waveform and proceed with the tutorial.
Let s start by setting the OSC Balance and LFO 1 knobs to the 12 o clock position and set the X-MOD Depth all the way to the right. The sound should be very basic and have no movement. Now we re ready to manipulate the sound. 1) While holding a key on the JP-8000, turn the OSC Balance knob all the way to the left and listen to the sound generated by OSC 1. 2) Press the OSC 1 WAVEFORM button to listen to the different waveforms in the OSC 1 section. 3) Rotate the OSC Balance knob all the way to the right to hear the sound generated by OSC 2. 4) Press the OSC 2 WAVEFORM button to listen to the different waveforms of the OSC 2 section. 5) Use the RANGE and FINE tune knobs to detune OSC 2. 6) When finished, return to the triangle waveform in OSC 2 and the sawtooth waveform in OSC 1 and set the OSC Balance knob back to 12 o clock. The sound should now be back to its original settings. 7) Rotate the LFO 1 Depth knob a little to the right or left and notice the sound now has vibrato. 8) Set the LFO 1 Depth knob to the 2 o clock position and experiment with the Rate and Fade knobs of the LFO 1 section. The Rate sets the speed of LFO 1 and Fade reflects the time it takes for LFO 1 to reach the Rate after a key is pressed. 9) Hold a key down on the JP-8000 and use the WAVEFORM button (in the LFO 1 section) to listen to the different waveform types that can be assigned to LFO 1. 10) When finished, return the LFO 1 waveform to the triangle wave and set the LFO 1 Depth (in the OSC Common section) to 12 o clock. Pitch Envelope Next, let s alter the pitch over time by using the Pitch Envelope. 1) Move the Attack and Decay sliders of the pitch envelope all the way down and set the ENV Depth knob to the 2 o clock position. 2) Move the Attack slider about 3/4 of the way up and then play a note on the JP-8000. Notice that the pitch rises and then drops to the Decay point where it stabilizes at the correct pitch. 3) Move the Decay slider about 1/2 of the way up and play the note again. The pitch rises as before, but now it settles down to the correct pitch in a more gradual manner. NOTE:
Turning the ENV Depth knob to the left inverts the effect of the pitch envelope.
Pulse Width and Pulse Width Modulation Use the following procedure to experiment with the Pulse Width and Pulse Width Modulation parameters: 1) Select the square waveform for both OSC 1 and OSC 2 and set the Rate in the LFO 1 section all the way to the left. 2) While holding down a key on the JP-8000, sweep the PULSE WIDTH and PULSE WIDTH MODULATION (PWM) sliders to hear the re-shaping of their square waveform. Also, listen for the addition of new overtones. NOTE: Because of all of the adjustments made to the sound, it may be helpful to repeat the Initialization procedure (steps 1-4 under Getting Started p.7) as when we started the tutorial. This will make it easier as we discuss the filter and amplitude sections. Filter Use the following procedure to experiment with the Cutoff Frequency, Resonance, Slope, and filter type parameters: 1) While holding a key on the JP-8000, sweep the Cutoff Frequency and Resonance sliders. These are perhaps the most commonly used parameter sliders, so it is a good idea to become familiar with their sound. 2) Press the SLOPE button and listen to the effect of the different settings (-12dB /-24dB). 3) Press the TYPE button and experiment with the various filter types (HPF, BPF, and LPF). Experiment with different combinations of these parameters. 4) When finished, return the Slope to -24dB (lit red) and the Filter Type to LPF. 5) Move the Cutoff Frequency, Resonance, and ADSR sliders (under FILTER) all the way down. 6) Rotate the KEY FOLLOW, LFO 1 DEPTH, and ENV DEPTH knobs to the 12 o clock position. You should not hear any sound when you play the keyboard of the JP-8000. 7) Set the Cutoff Frequency slider 1/2 of the way up. 8) Rotate the Key Follow knob all the way to the right. Play on the JP-8000 s keyboard, starting on the upper section and moving down to the lower register. The sound should start with a bright quality and become more mellow, decreasing the number of partials. 9) Rotate the Key Follow knob all the way to the left and again play downward on the keyboard. The sound should now start with a mellow quality and become more bright, increasing the number of partials. 10) When finished, set the Key Follow knob to the 12 o clock position and keep the Cutoff Frequency slider 3/4 of the way up. Filter Envelope Use the following procedure to experiment with the filter envelope parameters: 1) Rotate the ENV Depth knob to the 2 o clock position and move the attack slider (under FILTER) 3/4 of the way up. As you hold a note on the keyboard, notice there is a swell in brightness to the sound and then an abrupt drop. 2) Move the decay slider to half the amount of the attack slider and play a note on the keyboard. The slope of the brightness in sound becomes more smooth because the distance between the attack and decay has been cut in half. 3) Move the sustain and release sliders to the same value as the decay. The character of the sound will now remain at the decay amount for as long as you hold the note on the keyboard. 4) Rotate the ENV Depth knob to the 10 o clock position and listen to the shape of the same envelope now inverted. Experiment with different filter combinations to become familiar with their functionality. 5) When finished, return the ENV Depth to the 2 o clock position, the attack slider to 3/4 of the way up, and the decay, sustain, and release sliders to half the amount of the attack slider. Amplitude Envelope The final experiment in this tutorial involves the amplitude envelope. This effects the volume of the sound over time. 1) Move the A, D, S, and R sliders (under AMP) all the way down (you should only hear a brief attack sound when you play the keyboard). 2) Rotate the LFO 1 Depth knob to the 12 o clock position and enable it by pressing the Auto/Manual button so that it is not lit. 3)
Move the attack slider 3/4 of the way up and hold a note on the keyboard. Notice
the swell in volume as the sound reaches the attack time then suddenly drops off
to the decay time (which is zero). 5) Move the sustain slider to the same position as the decay slider and listen to the difference. 6) Move the release slider to 1/2 of the way up and hold a note on the keyboard. After the sound completes the effect created by the attack, decay, and release, lift off the note and listen to the sound gradually fade away. NOTE: Experiment with the LFO 1 Depth effect by turning the knob to the left and right. This will add a vibrato effect based on the waveform selected in the LFO 1 section. Storing a Patch Once you are finished creating a Patch, it is necessary to store it in the JP-8000 s Internal memory. Use the following procedure to write a Patch into one of the 128 User locations: 1) Press PERFORM/PATCH to access the Patch Select display. 2) Press WRITE. 3) Use the DOWN/UP and [1]-[8] buttons to select the desired User Patch destination. 4) Press NAME (PERFORM/PATCH). 5) Use the NAME button to move the cursor and the DOWN/UP buttons to select the desired character. 6) Press WRITE. The Patch will now be saved to that User location. Summary The JP-8000 is a new generation synthesizer that bridges the gap between analog and digital synthesizers. It uses Roland s Analog Modeling Technology instead of sampled waveforms, in combination with front panel knobs and sliders to create incredible new sounds. The JP-8000 represents a new beginning for synthesists, composers, programmers, and performers. The JP-8000 captures the power, flexibility, and nuance of its ancestors, but also forges ahead with new features like Realtime Phrase Sequencing (RPS) and Motion Control to set the new standard in synthesizers. | |
|
| |
| |
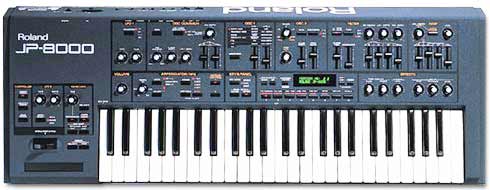 The
JP-8000 Music Synthesizer uses Roland new Analog Modeling Technology to combine
powerful sounds associated with vintage analog synthesizers with the flexibility
of digital technology and MIDI. Like classic analog synthesizers of the past,
the JP-8000 has numerous knobs and sliders for powerful realtime control, opening
a brand new world of musical possibilities and expression.
The
JP-8000 Music Synthesizer uses Roland new Analog Modeling Technology to combine
powerful sounds associated with vintage analog synthesizers with the flexibility
of digital technology and MIDI. Like classic analog synthesizers of the past,
the JP-8000 has numerous knobs and sliders for powerful realtime control, opening
a brand new world of musical possibilities and expression.